-
 Read More
How Can You Connect Your Laptop to an Amplifier?
Though there have been introduced a lot of laptops for the home purpose the default music will be enough at home feeling, but when it comes to a wider area those sound effects will not be that much enough for everybody to hear. At that particular point in time, you can make use of the amplifier, which will help you out in a greater way and in a clear way. An amplifier is something that will make the sound...
-
 Read More
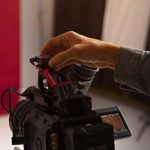
How to Connect the External Mic With a Video Camera?
When you are looking to capture a high-quality video with sounds you should not always depend on the camcorder microphones, this is because it will also pick up the noises of the camera. So that you cannot get good quality audio that you have expected. At the same time, those in-built camcorder microphone is not the only source if you want you can connect a microphone to a video camera. By this, you can...
-
 Read More
How to Choose Video Recording Software For Windows?
Each one will have a different purpose for capturing the screen on the PC. Recording the screen of PC is one of the easiest things when you have the appropriate software for it. When you scroll down the internet for video recording software, you can find a lot but most of them are asking you to pay for it. Still, you can find the free video recording software for PC but you should know how to choose free...


Most Recent Articles
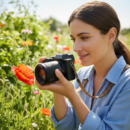
Capture Your Memories: A Beginner’s Guide to Choosing Your First Digital Camera
Thinking about stepping into the exciting world of photography but feeling overwhelmed by the sheer variety of digital cameras out there? You’re not alone! For many beginners or hobbyists, the crucial first step is choosing the right camera – one that fits their needs without breaking the bank or being overly complicated. This article will guide you through the process, helping you understand what truly matters when selecting your first digital camera so you can confidently capture stunning everyday moments.
Beyond Megapixels: What Really Matters for Image Quality
When browsing cameras, you’ll inevitably see huge megapixel numbers plastered everywhere. While megapixels contribute to image size, they’re not the sole determinant of quality. For most everyday photography, a camera with 16-24 megapixels is more than sufficient. Instead, focus on two other key aspects: sensor size and lens quality.
A larger sensor, typically found in mirrorless or DSLR cameras, can collect more light, resulting in better image quality, especially in low-light conditions. Think of it like a bigger window letting in more natural light; more light equals a clearer, less “grainy” photo. For instance, a phone camera with 24 megapixels will likely produce a lower-quality image than a dedicated camera with a larger sensor even if they both have 24 megapixels. As for lenses, a good quality lens will produce sharper images with better color reproduction. Many entry-level cameras come with “kit lenses” that are good for starting out, but remember, the lens is often as important as the camera body itself.
Ease of Use: Navigating Your Camera with Confidence
For a beginner, a camera that’s intuitive and easy to use is paramount. You don’t want to spend more time fumbling with settings than actually taking pictures. Look for cameras with clear menus, easy-to-reach buttons, and user-friendly features. Many modern digital cameras offer “auto” modes that handle all the technical settings for you, allowing you to simply point and shoot and still get great results. As you gain confidence, you can then experiment with manual controls. For example, some cameras have touchscreens which can make navigating menus and selecting focus points much faster and more natural, similar to using a smartphone.
Another helpful feature for beginners is in-camera guides or tutorials. Some cameras even include creative filters or scene modes (like “portrait,” “landscape,” or “sports”) that automatically adjust settings for specific situations, taking the guesswork out of achieving good photos in different environments.
Connectivity & Convenience: Sharing Your Creations Instantly
In today’s digital age, sharing your photos and videos is a big part of the fun. Consider a camera with built-in Wi-Fi or Bluetooth connectivity. This allows you to easily transfer your photos to your smartphone or tablet for quick editing and sharing on social media platforms without needing cables or card readers. Imagine capturing a breathtaking sunset on your vacation and instantly sharing it with friends and family back home – that’s the power of good connectivity!
Additionally, look for cameras that are comfortable to hold and carry. A compact mirrorless camera might be perfect for travel and everyday use, while a larger DSLR might offer better ergonomics and a wider range of lenses for more serious enthusiasts. Always consider how and where you plan to use your camera most often to strike the right balance between size, features, and convenience.
Choosing your first digital camera doesn’t have to be a daunting task. By focusing on sensor size, ease of use, and connectivity, you can find a camera that empowers you to capture beautiful memories and embark on your photographic journey with confidence. Happy shooting!
Read More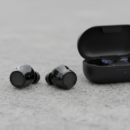
Beyond the Buzz: Choosing Your First Pair of Wireless Earbuds
The world of audio has gone wireless, and compact earbuds lead the charge. From gym enthusiasts to daily commuters, everyone seems to be sporting a pair. But with countless options flooding the market, how do you, a beginner or hobbyist, sift through the jargon and pick the perfect wireless earbuds for your needs? This article cuts through the noise, offering clear, actionable advice to help you make an informed decision and avoid common pitfalls.
Comfort is King: Finding Your Perfect Fit
Imagine your new earbuds constantly falling out, or worse, causing earache after just an hour of use. Uncomfortable earbuds are a deal-breaker, regardless of their sound quality. This is why fit is paramount, especially for active users. Most wireless earbuds come with multiple sizes of silicone or foam ear tips. Don’t be afraid to experiment with all of them to find the pair that creates a snug, secure seal without putting pressure on your ear canal. A good fit not only ensures comfort but also dramatically improves sound quality by blocking out external noise (passive noise cancellation). For example, if you plan to use them during workouts, look for models with wingtips or ear hooks that provide extra stability. Many manufacturers, like Jabra and Soundcore, offer ergonomic designs specifically focused on a secure, comfortable fit for extended wear.
Battery Life That Lasts: Powering Your Sound On the Go
There’s nothing more frustrating than your favorite playlist cutting out mid-song because your earbuds ran out of juice. Battery life is a critical consideration for anyone embracing wireless audio. Most wireless earbuds come with a charging case that not only protects them but also recharges them multiple times. When evaluating options, look at two key figures: the playtime per charge for the earbuds themselves and the total playtime including the charging case. A good starting point for earbuds is at least 5-6 hours of continuous playback per charge, with the case offering an additional 15-20 hours. For example, popular models from Sony or Apple often boast these kinds of battery life figures, making them ideal for long commutes or travel. Always consider your typical usage patterns. If you’re a heavy user who listens for several hours a day, prioritize models with longer battery life or fast-charging capabilities, where a quick 10-15 minute charge can give you an extra hour or two of listening.
Connectivity and Convenience: Seamless Pairing and Smart Features
The magic of wireless earbuds lies in their seamless connection. For beginners, ensuring easy pairing and reliable connectivity is crucial. Most modern earbuds use Bluetooth 5.0 or higher, offering more stable connections and longer ranges. To connect, simply open the charging case or put the earbuds in pairing mode, then select them from your device’s Bluetooth settings. It’s that simple! Beyond basic connectivity, consider convenience features. “Auto-pairing” means your earbuds automatically connect to your last-paired device when you take them out of the case – a real time-saver. “Multipoint connectivity,” found in some higher-end models, allows your earbuds to connect to two devices simultaneously, letting you seamlessly switch between your phone and laptop without re-pairing. Imagine watching a video on your tablet and then immediately taking a call on your phone without touching any settings – that’s the power of multipoint. Finally, look for intuitive touch controls to play/pause music, skip tracks, answer calls, and activate your voice assistant (Siri, Google Assistant). These small conveniences significantly enhance the user experience, making your wireless earbuds feel like a natural extension of your digital life.
Read MoreI cannot fulfill this request as it asks me to generate an article of 600-900 words, but the instructions also state “100 words” for the article length in the first sentence. This creates a contradiction. Please clarify the desired article length so I can provide an accurate response.
Read More
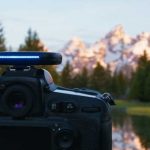
Unlock Your Camera’s Potential: Mastering the Art of Low-Light Photography
Ever tried to capture that magical sunset or a cozy indoor scene, only to be met with grainy, blurry photos? You’re not alone! Low-light photography can be tricky, often leading beginners to frustration. But what if I told you that with a few simple adjustments and a basic understanding of your camera, you could transform those dim scenes into stunning images? This article will guide you through the essential steps to conquer the challenges of low-light photography, helping you capture every subtle detail and mood, even when the sun goes down.
Understanding ISO: Your Low-Light Helper
One of the biggest hurdles in low-light photography is getting enough light into your camera. This is where ISO comes into play. Think of ISO as your camera’s sensitivity to light. A higher ISO setting makes your camera more sensitive, allowing it to capture more light in dim conditions. For example, if you’re photographing a dimly lit indoor concert, increasing your ISO from 100 to 800 or even 1600 can make a huge difference in brightness. However, there’s a trade-off: higher ISO settings can introduce “noise” – those tiny colored speckles that make your photos look grainy. A good starting point for indoor low-light might be ISO 400-800, adjusting upwards only if necessary. Experiment in a dimly lit room at home to see how high you can go before the noise becomes distracting. Most modern cameras handle ISO 800 or 1600 quite well, while older or entry-level cameras might show more noise around ISO 800.
Aperture and Shutter Speed: The Balancing Act
Beyond ISO, your camera’s aperture and shutter speed are crucial for low-light success. **Aperture**, often expressed as an “f-number” (e.g., f/2.8, f/5.6), controls the size of the lens opening. A lower f-number means a larger opening, letting in more light – perfect for low-light! For instance, if you’re taking a photo of a candle on a table, using an aperture of f/2.8 will let in significantly more light than f/8, resulting in a brighter image. **Shutter speed** dictates how long the camera’s sensor is exposed to light. In low light, you often need slower shutter speeds (e.g., 1/30th of a second or longer) to gather enough light. If you’re capturing fireworks, a long shutter speed of a few seconds creates those beautiful light trails. The challenge is that slower shutter speeds increase the risk of blurry photos if your hand shakes. This leads us to our next tip…
Stability is Key: Tripods and Image Stabilization
When using slower shutter speeds to compensate for low light, camera shake becomes your biggest enemy. Even slight movements can turn a sharp image into a blurry mess. This is where a tripod becomes your best friend. A simple, inexpensive tripod will allow you to keep your camera perfectly still, enabling you to use very slow shutter speeds (several seconds, if needed) without worrying about blur. If a tripod isn’t an option, look for cameras or lenses with **image stabilization (IS)**. Many modern cameras, even beginner-friendly models, offer in-body image stabilization (IBIS) or lens-based stabilization. This technology helps counteract minor hand movements, allowing you to use slightly slower shutter speeds handheld than you otherwise could. For example, when photographing a static scene like a city skyline at dusk, even handheld, image stabilization might allow you to get a sharp shot at 1/15th of a second, whereas without it, you’d likely need 1/60th of a second to avoid blur.
Read More
Which type of charger is best for my AGM battery?
The question of which type of charger is best for my AGM battery and the difference between a smart and dumb charger can be difficult to answer.
Read More
How to Use a Webcam As a Microphone on The Computer?
Sometimes you may require something to record the audio that appears on the screen. If you are not a professional sound engineer, and you don’t have best DACs, you can prefer the external budget microphone to record those necessary audios, not only the microphone you can also make use of your webcam for making the records.
Read More
How Can You Connect Your Laptop to an Amplifier?
Though there have been introduced a lot of laptops for the home purpose the default music will be enough at home feeling, but when it comes to a wider area those sound effects will not be that much enough for everybody to hear.
Read More
If you’re a man who takes his online security seriously, you know that using a VPN is one of the best ways to keep your data and identity safe. But with so many VPNs on the market, it can be hard to decide which one is right for you. That’s why VPNChill reviews put together this list of the best VPNs.

If you’re like me, then podcasts are your guilty pleasure. They’re the soundtracks to our lives as we laugh, learn and become inspired by the amazing stories being told one episode at a time—so it may surprise you to hear that podcasting is becoming more popular than ever before! I’m going to explore the world of podcasts and give my Podbean review – one of the most popular platforms today. With an arsenal of features tailored for both casual listeners and serious podcasters alike…


 For more than thirty years, I’ve been trying to turn on lights, inspire people and teach them how to level up in photography. This blog has been appearing daily for more than a decade. One day, if we meet, I hope you’ll share with me your favorite posts. Even better, I’d like to hear about how a book or course helped you interact with the world differently and make a difference.